Monday, April 26, 2010

Devil's Den State Park


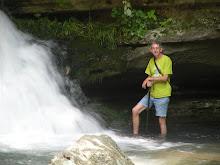
PHOTO OPS AT DEVIL'S DEN INCLUDE, bluff view from Yellow Rock, one of many wildflowers along trails, tree stump destoyed by bear looking for grubs and bugs, and waterfall along DD Trail.


Spring in the Boston Mountain Plateau of the Ozark Mountains in northern Arkansas is a great time of the year to hit the hiking trail with your camera.
More specifically, the trails of Devil's Den State Park located just south of Fayetteville.

Created in the 1930's as part of the federal Civilian Conservation Corps, Devil's Den was one of the first state parks in Ark. and the many hand-built cabins, bridges, and trails offer outstanding photo ops. An example is the hand-built stone dam across Lee Creek, featured as our main blog photo.

Of the many trails available at DD, the two I enjoyed the most are (in order of popularity) Devil's Den Trail and the Yellow Rock Trail.

The DD Trail offers a three-stage water fall that can be magnificent after a heavy spring rain and at the least "pretty" at other times.

Bat caves, huge crevices, fallen boulders as large as houses and weird rock formations, along with enough wildflowers to make a full bouquet, make this trail the favorite with many visitors. This relatively easy and short trail, suitable for most family members, starts right behind the visitor's center.

From atop massive cliffs riddled with crevices and caves, the Yellow Rock Trail offers some incredible overlooks showing Lee Creek carving its through the valley. In order to preserve the wildness of the area, these cliffs don't have warning signs or safety rails, so watch your step and keep an eye on your kids.

Proper footwear, a water bottle and a snack are recommended for this trail, I DON'T recommend pets on this trail. And by all means DO NOT FORGET THE CAMERA!
This is a slightly longer and tougher hike, but the photo ops are countless. The switchback trail seems to offer something new at every turn.

Unless you are just a hard core hiker that likes to walk up hill a lot, I DON'T recommend the Overlook Trail. Just get in your car and drive to the lookout point if you must, but you will only look down into a heavily wooded valley. The CCC style pavilion is cool and a good place to relax, but not worth nearly the nearly 5 mile hike in my opinion.

There are other longer, tougher trails that should only be attempted by experienced cross-country, over night camper-hikers.

Lee Creek that runs through the heart of the park abounds with photo ops as well. From the stone dam to the small stone cabin along a remote stretch of the creek, to the old mill dam and homestead ruins. There are some excellent areas for family fishing or paddle boat rides.

The park offers a modern swimming pool, restaurant, store ( these are seasonal), laundry and quaint stone cabins with modern facilities, including satellite TV, modern full kitchen, some even with spa tubs!

After leaving Interstate 540, the closest gas station is in Winslow 12 miles away. And the closest digital camera batteries are some 30 miles away in Fayeteville!

If you're looking for new territory to explore, Devil's Den State Park in Northwest Arkansas should be on your agenda.
You can check out the park through the website www.mountainstateparks.com/devils-den/

Wednesday, February 24, 2010

CHEAP light box for viewing negatives/slides

Tired of trying to hold those 35 mm film negatives/slides up to a light bulb or in front of the window to find what you want? Then you need to get a negative light box.
I know, they can cost hundreds of dollars and it isn't worth it for the amateur photographer.

Well, how about 10 bucks?

Look in the lighting department of most department stores for a small portable under the counter fluorescent light. They are usually about 14-16 inches long, will sit flat on a desk top, or if you wish, can be mounted on a wall next to your desk for quick use.

Depending on your eyesight, a small magnifying glass might be useful.

WATCH FOR an upcoming blog on copying negatives and slides as digital images.

Monday, February 22, 2010

Adventure photos


With the coming of each season, and the trip down every road, we can find photo ops in some of the most common places, as well as off the beaten path and even into remote wilderness.
These are some of those places depicted by photos taken by myself and wife Roberta over the years....hope you enjoy and perhaps become inspired.

Sunday, February 14, 2010

Winter photo tips

Here are a few winter photo tips everyone should know.
Remember, when you are cold and not functioning at your best, the same applies to your camera gear.
* Protect yourself by dressing in layers and using chemical heat packs to keep hands, feet, or body warm.
* Protect your camera with a padded camera bag with one of these chemical packs inside to keep your battery warm and functioning. Or, if your coat is big enough, you can keep the camera zipped inside and use body heat in the same manner.
* To avoid condensation build up on the inside of your camera when you go from a cold climate to the indoors, either place the camera in a cool spot just inside a door for an hour and then move to a slightly warmer spot inside to let it warm up gradually, OR, place it in a large Zip Lock type bag BEFORE taking it inside.
This allows the condensation to build up on the inside of the bag and NOT in your camera.
You can go ahead and remove your card and process your photos while the camera is warming up.
* When shooting under damp conditions, mist, rain, snow, etc., protect your camera with a plastic camera glove (available from camera shops or online at Porter's Camera Store www.porters.com).
These sleeves have a draw string in the end of a long tube that snugs down around the end of the lens and then opens up to fit the camera.
At the back end of the sleeve is a cutout for clear viewing through your camera's eyepiece. However, with auto focus cameras this isn't a real issue, just look through the plastic to make sure you have the subject framed like you want it and shoot.
NOTE.... A plastic grocery bag with a hole cut in the end and fastened around the lens with a rubber band will also work in a pinch.
* Use a small umbrella to shade the lens from sun flares or getting false light readings when your subject is in the shade and your camera in the sun...also valuable in keeping rain or snow off the camera and lens when no other protection from the weather is available......there are umbrellas that can be attached to tripods that leave the hands free...otherwise it takes a little practice to handle all the gear at once....or you can take a helper along to hold it.
* If shooting snow photos, check your camera for a "snow" setting that will give you white snow, not gray.
For more info regarding this problem, go to the New York Institute of Photography web-site www.nyip.com.
*******If you shoot a film camera, when you submit your film for development ask for one "step" of blue to be eliminated. This will help eliminate a bluish/gray cast to trees, old wood and shadows.

When show hits, be prepared to get out into your neighborhood on foot to get those great shots of children building snowmen, snowball fights, snow shrouded shrubs, birds around feeders (especially Cardinals), etc.
LOOK for those unusual shots and have fun!

Monday, August 31, 2009

Boxley Valley morning

During a recent photo scouting trip to Newton County in northwest Arkansas, I spent a couple mornings shooting the country scenes of Boxley Valley which is just south of Ponca along Highways 43 and 21.

I was using a Sony alpha 200 on auto setting to shoot in early morning fog, rising sun, and then normal light conditions.

Here are a few of the shots and some info about them.....


A lone bull elk feeds in a farmer's pasture along the Buffalo National River at daylight. Elk will be entering the rut season in a few weeks and bulls will be bugling to attract cows and challenge any young interlopers who might pose a threat to leadership.

The best times for viewing elk in the valley and near Ponca is at daylight and just before sunset.

PHOTO NOTE: For best photos of elk along the river, a 300 mm or better zoom lens is best. Sometimes the herds will drift close to the fence line and offer an easy shot, but not often.
With the low light of morning (or evening) the camera ISO setting can be raised to a higher number, but a tripod or padded fence post is recommended to prevent camera shake and blur.


Ducks of several species frequent a marshy area along Highway 21 in Boxley Valley. It is not unusual to see geese and even swans at daylight and late evening.
PHOTO NOTE: Watch out for sun glare when shooting across water. You may have to narrow your sight picture to crop out the harsh sun rays coming into the camera or the intense sunspot on the water.


This lone morning glory vine along a farmer's fence offered a few sparse spots of color in an otherwise sea of green foliage.


Large, older barns like this one are common in the Boxley Valley area. Many are close to the highway like this one and make for easy shots. However, many of them have a lot of farm clutter that can distract from the rustic beauty of the structure.
The view through the hay mow of this barn shows a herd of cattle grazing along the Buffalo River.
Cattle and elk share the same graze land without too much trouble, but seldom do you ever see them in the same fields.


What country farm scene would be complete without a cat? This youngster was curled up asleep at the base of a fence post and followed me for nearly a quarter mile up and down the roadway, sometimes stopping to poke around in tall grass for a field mouse.

PHOTO NOTE: Whenever possible, try to shoot animals in as natural type setting as possible. This cooperative little critter seemed to like the attention I was giving and even let me place it on top of the hay for what looks like a posed "look at me" shot.......NEVER TRY TO PICK UP A WILD ANIMAL, AND BE CAREFUL OF OTHERS YOU DON'T KNOW.

Thursday, August 27, 2009

USS Razorback


The stainless steel steps in the ladder-well of the aft hatch of the ancient diesel class World War II submarine are worn smooth by numerous feet on untold missions all over the world.

They lead down to a dim and once-ominous world of danger.

That feeling is enhanced when you add the faint odors of various oils and greases emanating from now silent engines, along with the sight of massive torpedoes filling the cramped space.

Welcome to the USS Razorback (SS 394).


A visit to this war sub from a bygone era was the highlight of a recent vacation trip to the Arkansas Inland Maritime Museum in Little Rock, AR. www.aimm.museum.com

The decorated war sub (named after a species of whale, not hogs), served combat roles in World War II and Vietnam.

Launched in 1944, the USS Razorback entered Tokyo Harbor in 1945 and participated in the formal surrender of Japan at the end of WWII.

The Razorback was awarded five battle stars in the Pacific Theater in WWII and four stars during the Vietnam War where it participated in many covert operations with Special Forces troops, including Navy Seals. The vintage sub was also very active in the Cold War as well.

Many of the files regarding these special ops are still classified as “Top Secret,” though some files have been declassified and are available for public viewing on the Internet.

This honored veteran also served two nations, the U.S. and more recently Turkey, before it became a historical attraction at the Arkansas Inland Maritime Museum in North Little Rock.

The sub is rated as 90 percent functional — international law required the removal of propellers and batteries since it is a weapon of war and owned by a city. The Razorback has an overall length of just over 311 feet with a beam of just 27 feet and boasts 10, 21-inch torpedo tubes.

Currently tied to the dock and manned only by tourists and occasional military veterans groups, in its day the Razorback routinely dove to its capable depth of 400 feet during combat maneuvers.

Its crew of 75-90 men lived in Spartan conditions, including sleeping in berths just inches above racks of live torpedoes, as well as sharing just two showers and four toilets.

Deployments at sea usually averaged 45 days during wartime.

As you make your way to the forward hatch along narrow passageways, a myriad of gauges and handles, most still bearing identification tags written in Turkish, are within inches of your face.

And as you learn how to maneuver through the sub’s many hatches, you also realize there were probably no tall, fat submariners on the Razorback.

The maritime museum boasts a large collection of artifacts from the Razorback, including the ship’s original bell donated by its last American captain.

Several souvenirs are also available, from caps and T-shirts to stamped dog tags for the kids.

Admission is $6 for adults and $4 for children 12 and younger, for military (past or present) and seniors 62 plus.

The maritime group in charge of the sub is also in the process of restoring a section of berths to serviceable condition and offers special “sleep overs” on the sub for Boy Scout, church and veterans groups.

Outside the museum are the large brass propellers from the sub, along with a large deck gun representative of the type that once adorned the deck of the Razorback and other submarines and warships.

PHOTO NOTES: Camera used for submarine shots, Sony Alpha 200 with 18-75 zoom lens and regular flash.Lighting inside sub, although dim by outdoor standards, was sufficient and a larger flash was not needed. Even a small point and shoot camera should take excellent shots inside the submarine and the museum.

Whether you are an Ark. native, or a visitor to our wonderful Natural State, make sure a tour of the Razorback is part of your agenda.

And as the sailors always say, "Fair winds and following seas!"

(published with permission from the Batesville Daily Guard)

Monday, August 10, 2009

Cameras and eyeglasses

Anyone who doesn't have to wear eyeglasses should count their blessings, especially if they use a camera or computer very much.

As a wearer of eyeglasses since a youngster, I can tell you they are a hassle when trying to focus on a computer screen with small fonts and then look down at your key board.

A few years ago I started having trouble seeing my computer screen and the proofing pages at the newspaper where I work. This was a real problem.

I had my eyes checked, the eye doc gave me stronger bifocals, different size bifocals, triple focals, you name, he tried it. And even though I took samples of my newspaper proof pages, measured how far it was from my nose to the computer screen, what size font I had to work with, etc., nothing seemed to help. Until I voiced my frustration to Velvet Prewitt at Velvet's Optique in Batesville, AR.

With a just 20 minute visit to my desk on her way to work one morning, she took a few measurements, made a few notes and within just days I had a pair of mid-range computer glasses with bifocals that allow me to see the computer screen perfectly while retaining my reading ability of smaller print with the bifocals. My long distance vision is affected slightly, but inside an office setting I seldom notice the difference.

If you wear prescription sunglasses, you know the lens darkness can be so complete that peripheral light around the glasses can be so strong as to make you squint more than if you were wearing clear lenses in bright sun.

And the transitional lens that change in sunlight, and cold weather, can be a hassle too. In addition to staying dark on cloudy, cold days, you will often find yourself needing to take your glasses off when trying to use a camera's viewfinder because you can't be sure the exposure is right looking through dark lens.

These too were problems I had dealt with over the years all to no avail until again I talked to Velvet. Although her office doesn't do eye exams, she has been filling my optical prescriptions for years and has saved me lots of money on quality eye wear and knows what my day to day routine consists of.

The solution she found for this particular problem was to go to "tinted" prescription glasses with UV protection. I was able to choose the tint color and the darkness of the lens that serves me best. I chose a light to medium green tint and was able to put the new lens in an old frame, thus saving myself more big bucks.

This particular tint serves me well for everyday sunglasses, but when it comes time to take a photo, I still have enough clarity while focusing that I can pretty well tell what the exposure looks like without taking off my glasses.

I have found that eyeglasses, computers and cameras can coexist in a world of computers and cameras. Like a lot of things in life, it's just a matter of finding the right problem solver.